


A Brief History of Your Car’s Braking System
The brakes are one of the most essential parts of your car. Over the years, automakers have implemented lots of different braking systems. Today, we’re diving into a brief history of automotive brakes. Keep reading to find out how we got to where we are today.
Wooden block brakes
The very first automotive braking system was wooden block brakes. As the name suggests, these brakes consisted of a lever and some wooden blocks. When the lever moved, it forced the wooden block directly against the steel rim of the wheel. This created friction, which caused the car to stop. Wooden block brakes were first used in horse-drawn carriages. They were also used in steam-powered cars. As long as they went no faster than 10 to 20 miles per hour, wooden block brakes could bring moving vehicles to a halt.
When wheel technology improved from steel rims, wooden block brakes became obsolete. In the 1890s, many automakers began using rubber tires. Since wooden block brakes didn’t work anymore, automakers needed a new system of brakes.
Mechanical drum brakes
In 1899, Gottlieb Daimler thought of a new braking system. He theorized that if a cable-wrapped drum was connected to the chassis of the vehicle, it could bring it to a stop. Based on this idea, Louis Renault built the first mechanical drum brake in 1902. Renault’s brakes are thought of as the basis for modern automotive brakes.
Expanding internal shoe brakes
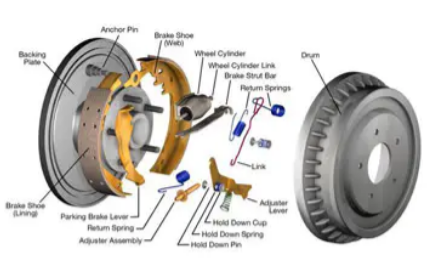
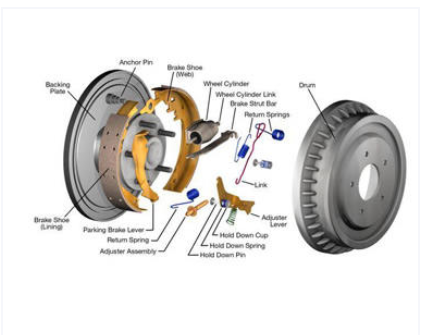
Although mechanical drum brakes were an improvement, they often malfunctioned. Since they were external brakes, they got exposed to precipitation and extreme temperatures. Eventually, expanding internal shoe brakes were developed. This brake system was stored inside a metal drum, preventing damage caused by natural elements. This metal drum was attached to the wheel. Inside the drum, pistons expanded brake shoes when the brakes were activated. The expanded brake shoe brushed up against the inside of the drum, creating friction. This caused the wheels to slow down and eventually come to a complete stop.
Hydraulic brakes
Expanding internal shoe brakes were an important innovation, but they had one big problem. They required a significant amount of force to operate. This problem was addressed by the invention of hydraulic brakes. In 1918, Malcolm Loughead invented the first four-wheel
hydraulic braking system. These brakes used brake fluid to move hydraulic force from the brake pedal to the brake shoe. Unlike its predecessors, hydraulic brakes required much less force from the driver to operate. Many automakers integrated hydraulics into their braking systems by the late 1920s.
Disc brakes
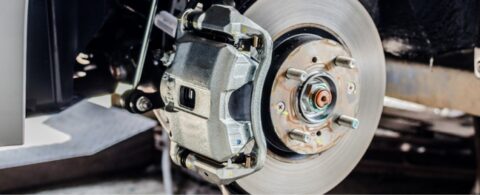
Hydraulic brakes weren’t a flawless design. For one thing, they often needed maintenance for leaking. Additionally, they became less effective over time as the speed capacities and sizes of cars increased. Instead, automakers began using disc brakes that had hydraulic functions. Disc brakes weren’t new. In fact, they were invented back in 1902 by William Lanchester. In the mid-20th century, they became a popular option for auto manufacturers.
Anti-lock brakes
Anti-lock brakes date back to the 1920s and were first used on airplanes. Automakers began incorporating them in the 1950s and ‘60s as a safety feature. Anti-lock brakes give drivers more control because they stop brake systems from locking up. When a lock is detected, the hydraulic valves reduce the pressure on a wheel. This prevents the vehicle from spinning. By the 1970s, anti-lock brakes were a popular safety feature. These days, they’re a standard feature in most cars.
What is a master cylinder?
For being such an essential part of your brake system, the master cylinder doesn’t get enough love. Today we’re talking all about what the master cylinder is and why it’s so important. We’ll also go back in history to find out its origin story. Let’s dig in.
The master cylinder is a tube in your brake system that transports hydraulic force from the brake pedal to your wheels. When your foot presses down on the brake, it creates a force that passes through the cylinder. The force is pushed through the master cylinder and into the brake lines to reach the calipers. The calipers clamp onto your rotors,and this stops your wheels from rotating.
Car aficionados think of the master cylinder as the heart of your car. In a lot of ways, they serve the same function. Like your heart, the master cylinder pumps fluid out of it. Instead of blood, it pumps brake fluid. Instead of going through arteries, the master cylinder pumps the brake fluid out through brake lines. Both the heart and the master cylinder are vital components. This analogy illustrates just how important the master cylinder is.
How does it work?
Let’s get into the details. When you press down on the brake pedal, it pushes the pushrod further into the master cylinder. Inside this dual-chamber cylinder, there are two pistons and a spring. The pistons work like plungers, pushing brake fluid along through each of the chambers. While they move forward, hydraulic pressure builds up. This is the force that makes the calipers clamp onto the rotors. This prevents your wheels from spinning, bringing your car to a stop.
The hydraulic brake system has to be airtight to function properly. To ensure this, a reservoir sits above the cylinder. When you remove your foot from the brake pedal, brake fluid floods back through the brake lines and into the reservoir.
How did the master cylinder come to be?
Brake systems weren’t always this sophisticated. The first hydraulic braking system was invented in 1918 by Malcolm Lougheed. He figured out how to apply liquid pressure to brake shoes, causing them to push against the drums. This invention caught on, and Chrysler eventually picked it up. They improved Lougheed’s model and named their version Chrysler-Lockheed hydraulic brakes. These were used from 1924 to 1962. Lougheed’s system had problems. Since it was a single-cylinder model, a minor fault or leak could cause the entire system to fall apart. One small issue could affect the entire system, and your brakes could completely die.
A company called Wagner Electric found a solution to this problem. In 1960, they invented a dual-cylinder brake system. Around the same time, American motors developed their own dual-cylinder system. Their design separated hydraulic lines by pairing diagonally-opposed wheels. With this model, you would always have one front and one rear wheel with functioning brakes, even if one of the two circuits was faulty. In 1962, Cadillac also created their own dual-cylinder system. Instead of pairing diagonal wheels, they separated front and rear hydraulic lines.
This dual system created a safety net, ensuring that one leak wouldn’t ruin the entire brake system. In fact, in 1967, the federal government mandated dual-braking master cylinders. Having separate circuits is reported to prevent tens of thousands of car accidents annually.
7 Signs Your Brakes Need Maintenance
The brakes are arguably the most important safety feature of your car, so you need to take good care of them. Luckily, your car will usually let you know if there’s a problem. Today we’re talking about 7 signs to look for if your brakes need maintenance.
1. Burning smell while driving
A chemical burning smell could be a sign that your brakes are overheating. If this is the case, pull over immediately and allow your brakes to cool down. If your brakes are overheated, it means the brake fluid has reached a boiling point. This could cause your entire system to malfunction.
2. Soft or spongy brake feel or leaking fluid
An oddly spongy or soft brake pedal is an unmistakable sign of moisture in your brake system. This is often because of a leak in your hydraulic system. If this happens, it could cause your entire brake system to malfunction. Without your hydraulics functioning properly, the brake pads won’t be able to clamp down onto the rotors.
3. Wobbling or vibration
If you experience vibrating or wobbling, you could have an uneven rotor. All rotors eventually develop surface variations. These differences in thickness can create a wobbling motion when you hit the brakes. Wobbling or vibrating could also indicate an issue with the calipers. If the caliper’s piston is surrounded by debris or rust, then the caliper won’t be able to retract. This causes a vibrating motion.
4. Squealing noise when braking
When your calipers or brake shoes wear out, they’ll make an unmistakable squealing sound. This comes from the brake pad wear indicators. These indicators are metallic, so when they scrape against the rotor, they make a horrendous noise. This is one of the most obvious signs that your brakes need maintenance.
5. Pulling to one side while braking
If your car veers to one side when you’re braking, you probably have an issue with your front two brakes. This could indicate a caliper problem, a worn out brake hose, or a misaligned rotor. All these problems can cause your vehicle to brake unevenly. Since the functioning side tries to compensate for the malfunctioning side, your car will pull in one direction.
6. Grinding sound from the brake pedal
A grinding noise could indicate a number of problems with your braking system. It might mean you have a loose rock trapped in the caliper, which is a relatively simple fix. However, it could also be the rotor being scraped by the brake pad wear indicator. If this is ignored, it could lead to serious damage to your brakes. A grinding sound could also point to rust in your system. Regardless of the cause, it’s best to have a professional check out your brakes if you hear grinding.
7. Brake light illuminated on the dashboard
An illuminated brake light on your dashboard is a warning sign you can’t ignore. The brake light is triggered by your car’s diagnostics system to let you know your brakes need maintenance. The underlying cause for the brake light could be any number of reasons. To get to the bottom of it, you’ll need to get your system inspected.
No matter the issue, our experienced technicians at D&D Autoworks are always here to help. You can make an appointment online or give us a call. You can reach us at (952) 931-9696 for our Minnetonka Boulevard location, or (952) 922-9696 for our West Lake Street location. We look forward to seeing you soon.

Everything You Need to Know About Replacing Your Brakes
Brake replacement is no simple task. This is because your brake system is complex, and replacing any part of it can expose a problem with your system. If this happens, you’ll need to troubleshoot and repair the issue. Keep reading to find out more about the process for brake replacement. Understanding this job can help you decide how you want to go about replacing your vehicle’s brakes.
Steps to replacing the brake system
Most professionals will follow these steps when replacing the brakes:
- Loosen the lugs: Engage the emergency brake and unfasten the lugs with a lug wrench. Don’t detach the lugs all the way.
- Raise the vehicle: Place the car jack beneath the frame rail of your car. Make sure that the jack stands are positioned beneath your car, and rest your car on the stands. Once you’re positive your vehicle is stable and that its weight can’t shift, remove the wheels.
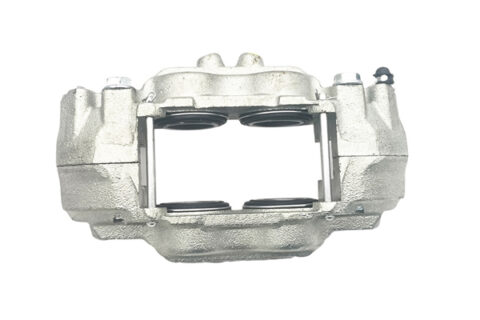
- Slide out the caliper: After you remove the bolts, slide the caliper out. Once removed, make sure there’s no strain put on the brake lines and rest the caliper on the suspension. If the caliper doesn’t slide right out, use a flat head screwdriver to help extract it.
- Remove the caliper carrier: Unfasten the bolts that hold the caliper carrier in place and remove the caliper carrier.
- Remove the rotor: Before disconnecting the rotor, look for a rotating screw. Some rotors will have this and others won’t. If you have one, take out the screw first. Pulling out the rotor might be difficult if there’s a build-up of rust or debris in the system.
- Install new rotor: Using a wire brush, wipe rust off the hub’s surface. Remove all oily residue from the new rotor with a degreaser. Then, install your new rotor.
- Assemble caliper carrier: Reconnect the caliper carrier and secure it with new bolts.
- Compress the caliper: Check to make sure that the brake reservoir’s cap is removed. Then, line up the piston of the caliper with its housing. You can use an old brake pad and a c-clamp to help you with this.
- Install caliper and brake pads: Install the brake pads in the caliper carrier, and loosely fasten the caliper bolts. Once you’ve checked to make sure the caliper can move without seizing up, fasten the bolts all the way.
- Re-attach the wheels: Attach the lugs by hand. Once your car is back on the ground, torque the lugs.
- Repeat, pump, and break in: Repeat this process on all 4 of your car’s wheels. Then, pump your brake pedal until you feel pressure. The last step is to break in your new system. Take your car through a few cycles of speeding up and gradually slowing back down. You’ll probably hear some noises at first, but these should recede if everything is installed correctly.


